
How to fix your Snipping Tool Not Showing Previews
We’ve been using Windows 11 now for about a month and in all of our playing around with Windows 11, we’ve noticed the Snipping Tool has been very inconsistent in the way it works – specifically that in many cases, when a snip is taken with Win+Shift+S the preview of the screenshot does not pop-up and does not allow you to click on it to edit, save or copy etc.
Here is the verified solution.
Step 1 – Verify Snipping Tool is taking screenshots
Press Win+Shift+S to activate your Snipping Tool.
If the capture dialog opens, take a screenshot. Note if you are choosing Rectangular mode, make sure you draw a rectangle to actually complete the capture.
In Windows Explorer, navigate to Pictures > Screenshots (or C:\Users\YourUserProfile\Pictures\Screenshots), then sort by date. If your screenshot is there, your Snipping Tool is actually working correctly.
If your screenshot is present in Pictures > Screenshots, skip to step 3.
If your screenshot does not appear in Pictures > Screenshots, press your Windows Key, start typing Snipping and when Snipping Tool appears, select open. Press the … and then click Settings.
Verify that the Snipping Tool settings appear as per the image below. Automatically copy changes and Automatically save screenshots are both on.

Try taking a screenshot again and then check your Pictures > Screenshots to see if it is now saved.
If it is, skip to Step 3.
If not, proceed with Step 2.
Step 2 – Reset & Repair of Snipping Tool Application
If your screenshot is present in Pictures > Screenshots, skip this step and go directly to step 3.
If there was no screenshot in Pictures > Screenshots, then proceed as follows :
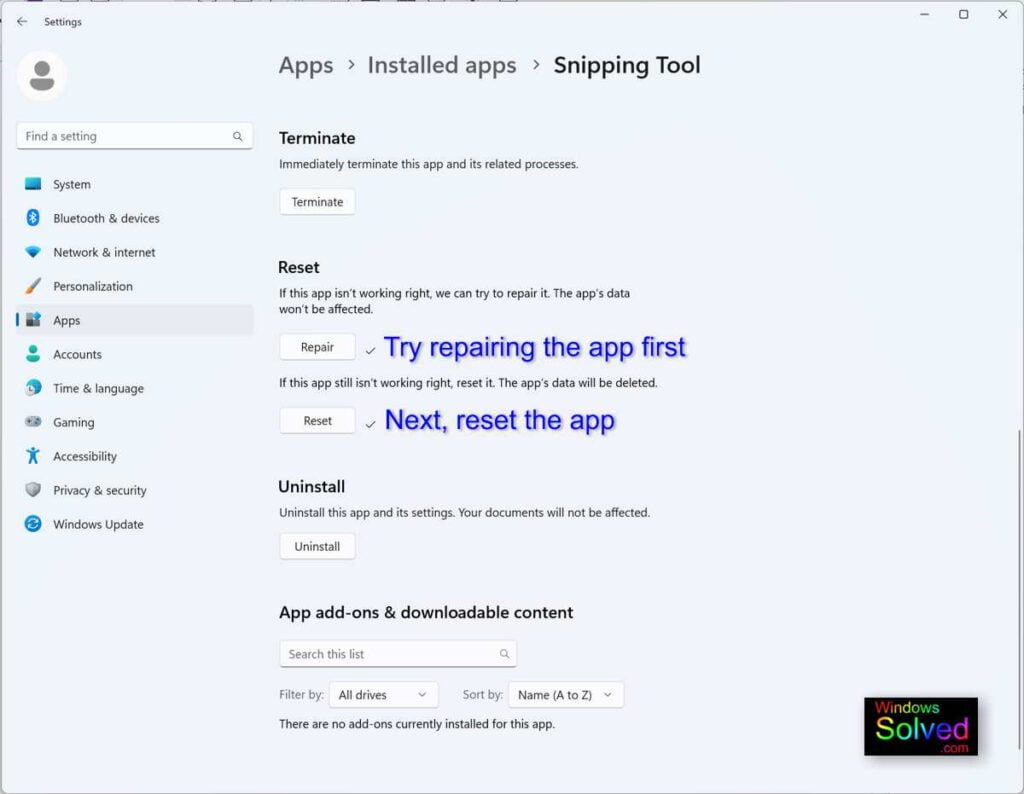
Press your Windows button on your keyboard, select Settings, click on Apps in left panel, and then click on installed apps at the top. In the search box, type in Snipping Tool. Once it appears, click on the … (3 dots) and select Advanced Options.
You should now see the same as the picture below.
Firstly, click on Repair and test your Snipping Tool again by taking a screenshot with Win+Shift+S and check again to see if your screenshot appeared in Pictures > Screenshots. If it did, continue to Step 3.
If Repair did not work, then click on Reset and check again. You should now have your screenshot showing in Pictures > Screenshots.
We’ve seen a lot of generic advice about running commands such as SFC /SCANNOW or checking Windows Update, uninstalling and re-installing the Snipping Tool etc, but in our experience, none of these actually did anything to solve the problem. If your screenshot is now showing in Pictures > Screenshots, your Snipping Tool is working correctly, and you can ignore all of the other suggestions found elsewhere and just go to Step 3 and your Snipping Tool preview pop-up will be solved.
Step 3 – Allowing Snipping Tool to show the preview pop-Up is done via notification settings.
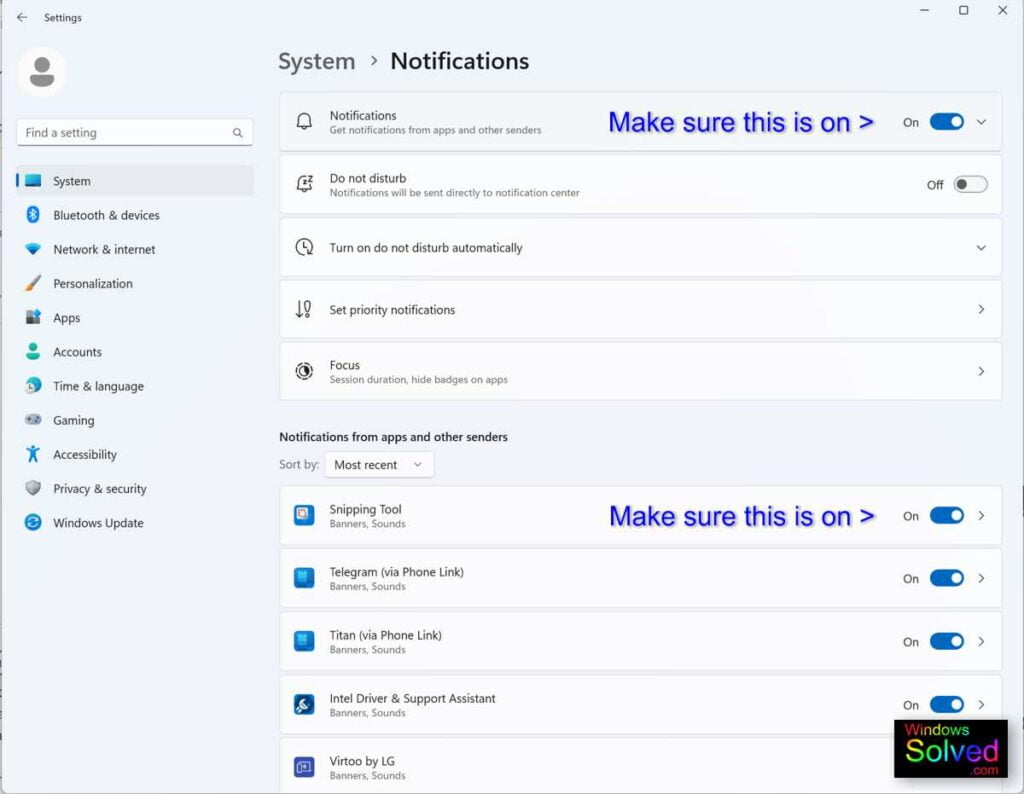
Press your Windows button and then start typing Notifications. Once Notifications & Actions appears, click Open.
We need to ensure that Notifications are enabled. As per the image below, make sure the following two settings of “Notifications” and “Snipping Tool” are set to on.
Once these are both on, try Snipping Tool again by taking a screenshot with Win+Shift+S (remember if you are using Rectangular mode, make sure you actually draw a rectangle to complete the capture).
Your Snipping Tool preview pop-up should now appear and you should be able to click on it to open it.
If the preview pop-up did not appear, continue to Step 4.
Step 4 – Adjusting Snipping Tool’s own notification settings.
Now we Windows Notifications set to on, we just need to configure the Snipping Tool settings to make sure it is enabled to show the preview pop-up notification.
Press your Windows button and then start typing Notifications. Once Notifications & Actions appears, click Open.
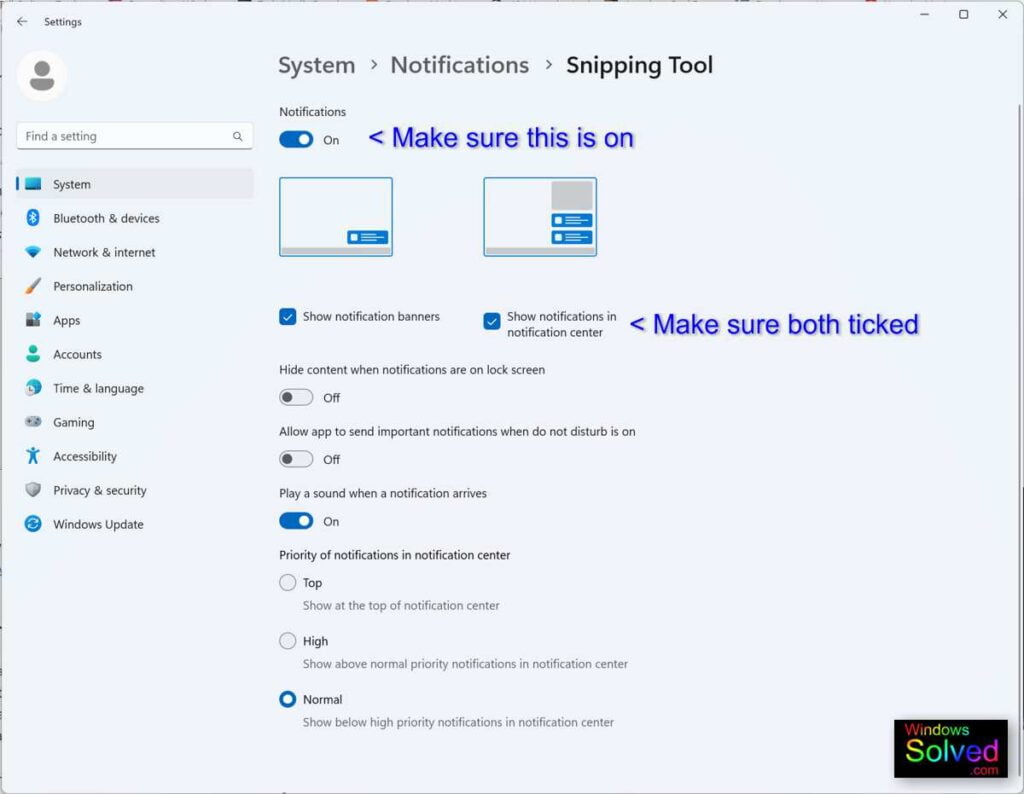
Find Snipping Tool in the lower list under “Notifications from Apps and other senders”.
This time, just left click on it.
As per the image below, make sure you have “Notifications” set to On and both the “Show notification banners” and “Show notifications in the notification center” are both enabled / ticked.
That’s it. Try taking a screenshot with Win+Shift+S (remember if you are using Rectangular mode, make sure you actually draw a rectangle to complete the capture) and your preview-pop up should now appear.
Your Windows 11 Snipping Tool should now open the preview pop-up for you to edit, save or share.
| If you found this article helpful, please leave us a comment and a rating below. You are also welcome to shout us a coffee by clicking on the cup! |
This solution was developed and confirmed in Windows 11 22H2 & Windows 10 22H2 by windowssolved.com | |
| This is an original article copyright to windowssolved.com This article may be shared via link to this page. You may not repost the content of this page, even with attribution without prior written permission. |


Did all of the above and still does not work.
None of this worked. Switch off ‘Do Not Disturb’ option. It worked for me.
Thank you for letting us know your solution.
And you are absolutely correct, the snipping tool uses notifications to show the popup and the Do Not Disturb would block those notifications. Great find and thanks for sharing.
Kind regards,
Ben
None of these steps worked for me but disabling the option to “Automatically Save Screenshots” did, as per this post: https://answers.microsoft.com/en-us/windows/forum/all/snipping-tool-not-showing-previewediting-window/eabe4db3-9b18-434a-a5e7-01a8d13579d5?page=5&rtAction=1682416937523#:~:text=ChrisReeve15,snips%20once%20again.
Thank you! Disabling the automatic saves did it for me. I use the snip tool frequently so having the notification behavior back again is such a relief! It will be nice to not have to open the tool preemptively any more…
Thank you very much for this tipp! Works now as it used to!
I had also tried all other steps (reinstall, repair, reset, etc). Disabling the “automatically save screenshots” worked for me as well. Mine was working properly until the most recent windows 11 update Oct 2024.
it worked – many thanks!!
For me too, and I had to do a repair as well
Thank you!! After reading 100 garbage attempts at addressing this common issue, you finally converted all the bases. 100!
Worked perfectly, many thanks
Thanks, this works.
Thanks!
-karl
Thanks Karl – Really appreciate you letting us know.
Glad we could help 🙂
Ben