How to Upgrade Microsoft Surface Pro 8 SSD – PART 1 of 4
The Microsoft Surface Pro 8 is a fabulous all rounder that operates as a fully fledged laptop or a tablet. It gives you the portability of a tablet with the power of Windows 11 meaning you can install all your PC applications and use it on the sofa or in the office.
As Microsoft transitions from Surface Pro 8 to Surface Pro 9, most of the best deals are available on the models with a tiny 128gb or 256gb SSD hard drive – which is not nearly enough for use a general purpose laptop. Sure you can buy them with a 1TB SSD but Microsoft typically charge at least a $600 premium. Or in the case of the Surface Pro 8 LTE (4G) models, they are only available in a maximum of 256GB – not nearly enough for business use. We recently acquired a pair of Surface Pro 8 Intel Core i7 16GB RAM 256GB SSD LTE models and set about upgrading both of them from 256GB to 1TB SSD hard drives. With 2 successful upgrades on our own units, we are proud to release this in depth article as a detailed how to guide for those looking to upgrade their own Surface Pro 8 SSD to 1TB.
Upgrading your Surface Pro 8 to a 1TB SSD Hard drive is easy to do and can be done for just a couple of hundred dollars in just an hour or two. As a bonus, in the process you will have the original SSD from the Surface Pro to use as you wish for backups etc. However, we would recommend you keep it in case your Surface Pro is returned for warranty. If you unfortunately have to return it, re-install the original SSD just in case they swap your unit and you don’t get your SSD with all of your data back!
This Guide has been broken up into 4 Parts
As this is a very detailed guide to enable you to safely and easily upgrade your Surface Pro 8 SSD, we have broken this article up into 3 Parts.
Part 1 (This page) – Covers what you will need, preparing for the upgrade and removing the SSD in your Surface Pro 8
Part 2 – Which SSD to buy/use when upgrading the Surface Pro 8 SSD
Part 3 – Cloning the Surface Pro 8 SSD
Part 4 – Reinstalling your NEW SSD into your Surface Pro 8
How to Upgrade Microsoft Surface Pro 8 SSD – PART 1 of 4
What You Will Need Before You Begin
- Obviously a Microsoft Surface Pro 8 🙂
- Your Microsoft Account login details (optional but recommended)
- A replacement 1TB SSD in NVME M.2 2230 format (we detail options below)
- Torx size 4 (T4) precision screwdriver
- Sim card ejector tool from your mobile phone (or included in LTE models)
- A pair of external USB SSD Hard Drive enclosures that accept 2230 format NVME SSDs
- Disk cloning software compatible with Windows 11 (We detail which program we used and how)
- Access to another PC to install cloning software and attach both external USB SSD enclosures to
- Thermal Grease (Some say optional but we say essential)
- Half a dozen Q-Tips or Cotton Swaps
- Rubbing Alcohol or Isopropanol
- Exacto Knife
Note : Items 9, 10, 11 & 12 are according to some optional but we say they are essential. They are required in order to re-use the aluminum heat sink that encases the SSD shipped from the Microsoft factory. This will help your new 1TB SSD stay cool and dissipate heat just the way Microsoft designed it and help avoid any potential warranty issues.
Step 1 – Preparing your Surface Pro 8 for SSD Upgrade
Whether your Surface Pro 8 is brand new or you have been using it for a while it is important to prepare the original SSD for upgrading.
If your Surface Pro 8 is brand new, we recommend unboxing it and powering it up.
- Ensure you sign in to your Microsoft Account during initial setup. If you don’t have an account, create one.
- This will register your Surface Pro 8 and your Windows 11 license key to your account. If you have a fatal problem with cloning the original SSD, you will be able to retrieve the correct Windows & Surface Pro 8 drivers etc directly from Microsoft again without issue. Better to be safe than sorry.
- If your Surface is running Windows 11 Pro, it will also store your all important Bitlocker or Device Encryption keys!
- After setup is complete, go to Windows Updates and check for updates.
- Both of our Surface Pro 8 devices were shipped with Windows 11 version 21H2. They need to be updated to version Windows 11 22H2.
- After each set of updates is complete and your Surface is restarted, check for updates again. You want to keep checking and applying updates until your Surface is showing version 22H2 and no more updates are found. This may take several restarts.
- By updating your original SSD prior to upgrade, your new SSD will then already have the latest updates and if you ever switch back to your original SSD, it will have already been updated too. So save time & update now once and you will not have to repeat the process later.
If you have already been using your Surface Pro 8 for a while, no problems.
- Again make sure you have at least once signed in to your Microsoft account from your Surface Pro 8
- Ensure that all Windows Updates have been applied.
Important – Disable any hard drive encryption. Windows 11 Pro uses BitLocker. Windows 11 Home uses Device Encryption.
You cannot clone a hard drive if it is encrypted. We need to disable it to clone the SSD and when we have finished, you will need to enable it again. Remember, when you enable it again later, you will get new encryption keys that you will need to save!
If your Surface Pro 8 is running Windows 11 Pro, you now have to disable Bitlocker drive encryption.
- To disable Bitlocker, on your Surface Pro 8, sign into an Windows administrator account
- Press the Windows key on your keyboard and begin typing bitlocker. When “Manage Bitlocker” appears, click open.
- Select “Turn off Bitlocker” and follow the prompts.
- Decrypting a brand new Surface will take about 10 minutes. If your device has been used for a while, it will take longer, potentially a few hours.
- Wait until you see that Bitlocker is turned Off.
If your Surface Pro 8 is running Windows 11 Home, you now have to disable Device Encryption. You cannot clone a hard drive if it is encrypted.
- To disable Device Encryption, on your Surface Pro 8, sign into an Windows administrator account
- Open Windows Settings by pressing the shortcut “Win + I” or clicking on Start and select the setting gear icon.
- Select Privacy and Security > Device Encryption.
- Toggle Device Encryption to Off
- Decrypting a brand new Surface will take about 10 minutes. If your device has been used for a while, it will take longer, potentially a few hours.
- Wait until you see that Device Encryption is turned off or disabled.
If you are using a 3rd Party hard drive encryption, follow the vendors instructions on how to disable.
Once you have logged into your Microsoft Account, applied all Windows updates and disabled any hard drive encryption. We are ready to move to Step 2.
Step 2 – Removing the original Surface Pro 8 SSD Hard Drive
Whilst there are some HDD cloning software platforms that will allow you to clone an SSD already installed in the PC, we find that removing the SSD and using another computer to perform the cloning process is easier and safer.

- Shut down your Surface Pro 8 and remove the power cable.
- Turn the device face down and lift the kick stand up to 90 degrees.
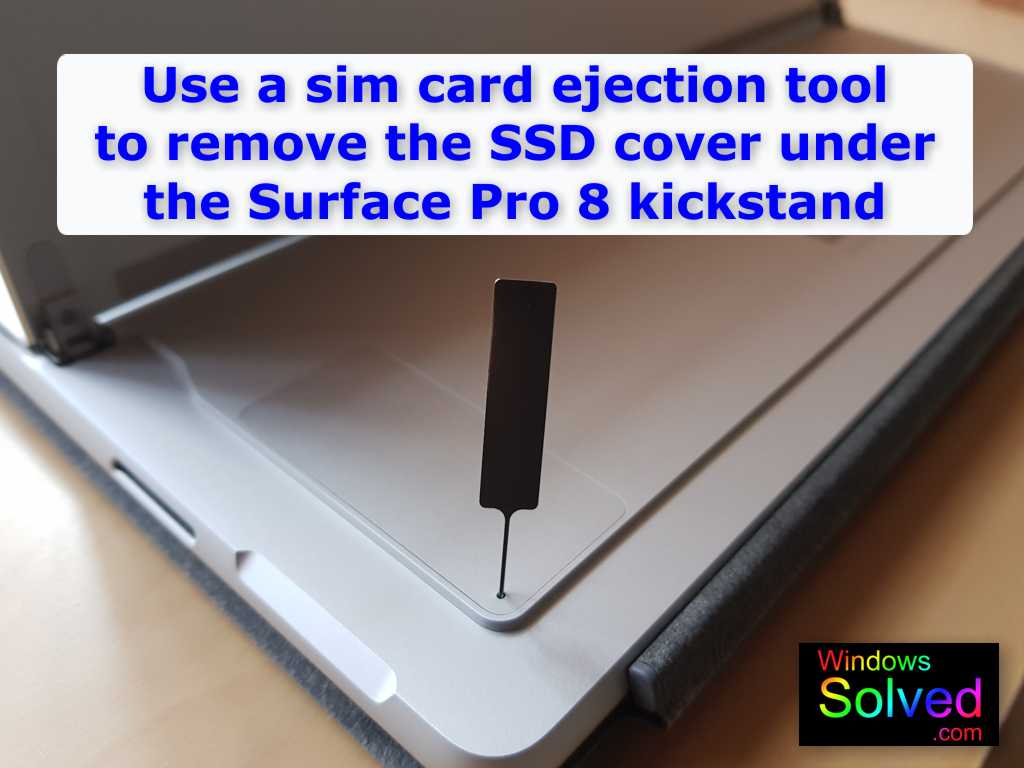
- Using a sim card ejection tool from your mobile phone (or as shown included with Surface Pro 8 LTE models), press down in the whole of the small cover as pictured above. When the cover pops up, remove the tool and lift the cover off.

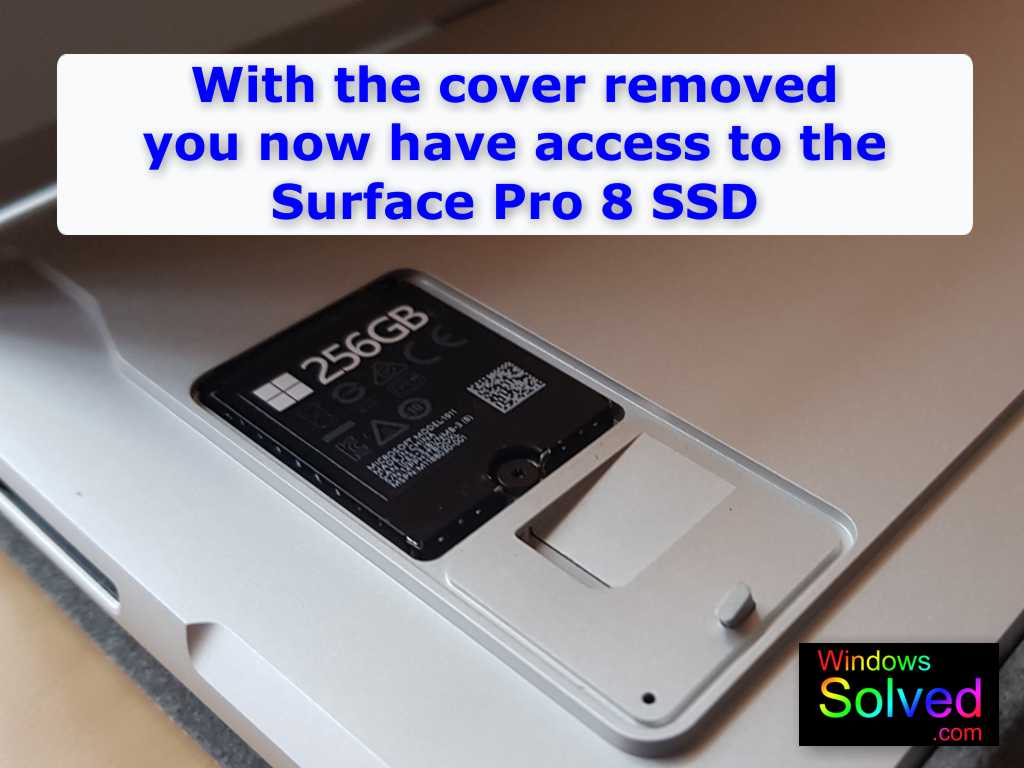
At this stage, don’t be concerned that the SSD may look a little different to the one that you have purchased. The SSD inside the Surface Pro 8 is installed inside a very thin aluminum case that acts as a heat sink to help keep your SSD cool.

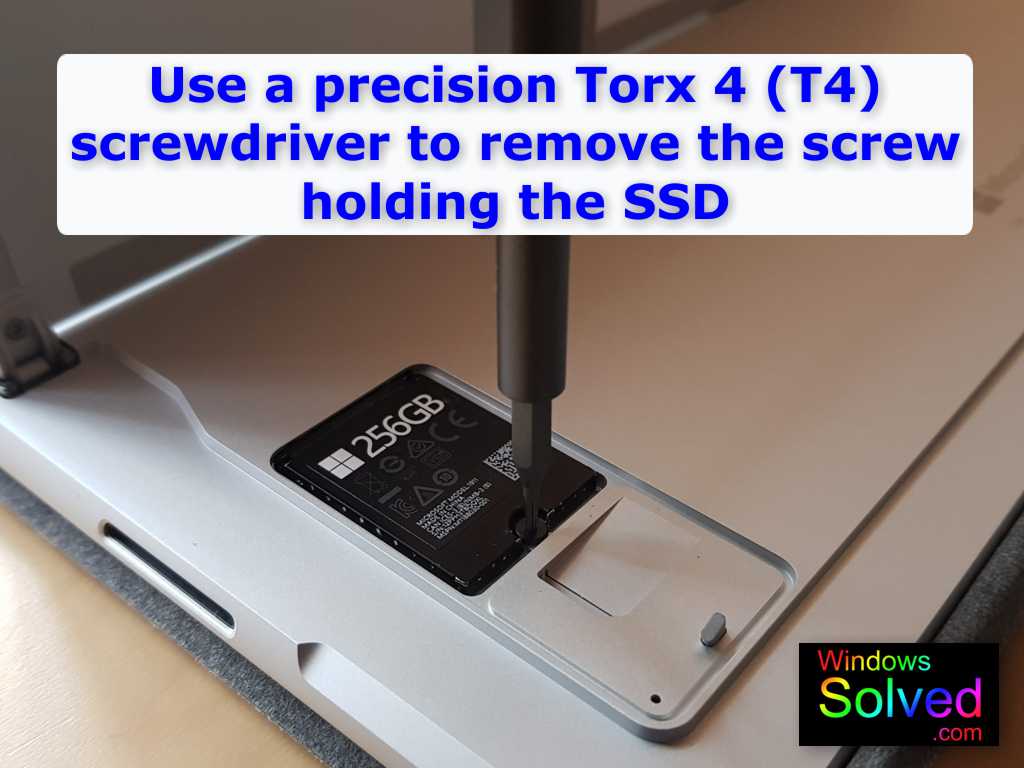
Using a Torx 4 (T4) precision screwdriver, remove the small screw that holds the SSD inside the Surface Pro 8. It will help if your Torx 4 bit is magnetic as this screw is very small. If you don’t have a Torx 4 screwdriver, don’t waste time at the hardware store as they typically don’t have anything below Torx size 5. Save time and just go straight to a computer or electronics store, or order one on your favorite online shopping platform. There a heaps available cheap on Amazon and Ebay as an example.

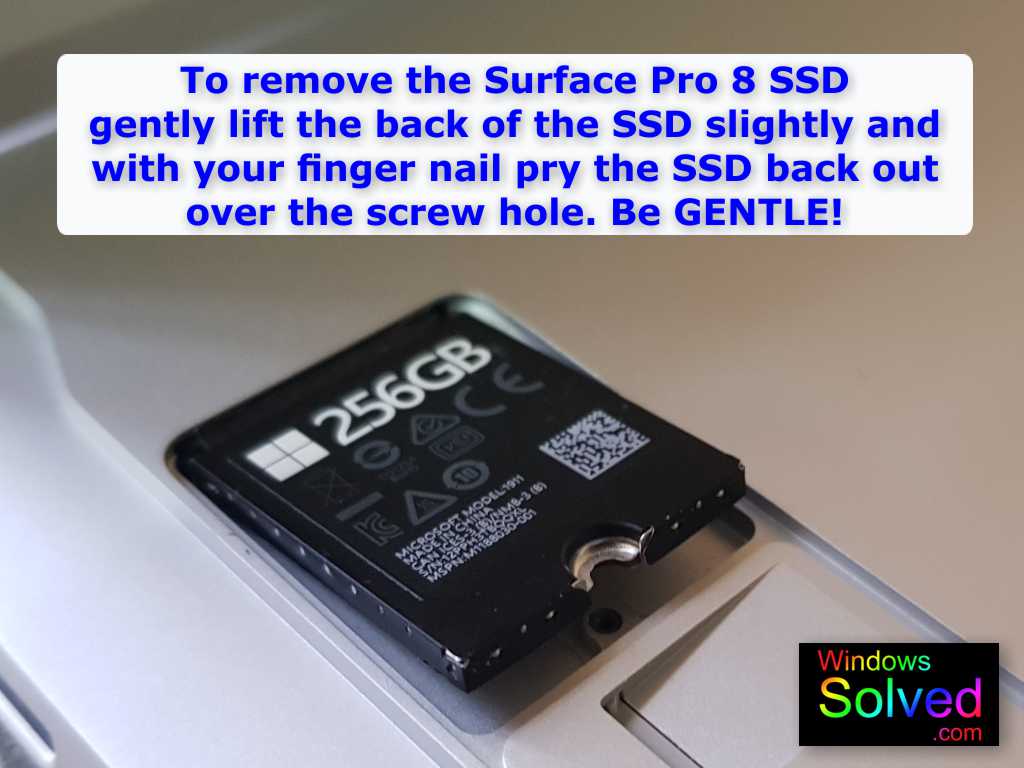
Gently lift the back of the SSD just a few mm so that it lifts it above the screw mount. You can do this with your fingernail or the tip of your T4 screwdriver. DO NOT LIFT IT ANY MORE THAN SHOWN IN THE IMAGE otherwise, you will break the SSD connectors on the SSD and possible even your Surface Pro device.
Once the back of the SSD has cleared the screw mount, we need to remove the SSD. It is extremally important to do this gently and keep the SSD as straight as possible. From the image above, it is connected near where 256GB is printed. Insert your fingernail into the top right of the SSD card above 256GB and gently pull pack towards the screw. It helps to support the back of SSD where it is raised with your other hand. You only want to move it 1/2 to 1mm at a time (1/32 Inch). Then do the same on the top left. Repeat the process just a mm at a time from both corners so the SSD is being removed straight. After a few movements, the SSD should just pop out or you can gently pull it straight back by gripping it on either side of the lifted rear section and pulling it out. Keep the SSD as flat as possible to the Surface device to avoid damaging the connections.
Once the SSD has been removed, proceed to step 2 of our guide – Which SSD to use when upgrading your Surface Pro 8 SSD Hard Drive
This solution was developed and confirmed on a Microsoft Surface Pro 8 Core i7 16GB RAM 256GB SSD LTE running Windows 11 Pro (version 22H2) by windowssolved.com | |
| This is an original article copyright to windowssolved.com This article may be shared via link to this page. You may not repost the content of this page, even with attribution without prior written permission. |


0 Comments
Trackbacks/Pingbacks