
How to Upgrade Microsoft Surface Pro 8 SSD – PART 4 of 4
This Guide has been broken up into 4 Parts
As this is a very detailed guide to enable you to safely and easily upgrade your Surface Pro 8 SSD, we have broken this article up into 3 Parts.
Part 2 – Which SSD to buy/use when upgrading the Surface Pro 8 SSD
Part 3 – Cloning the Surface Pro 8 SSD
Part 4 – (This Page) Reinstalling your NEW SSD into your Surface Pro 8
How to Upgrade Microsoft Surface Pro 8 SSD – PART 4 of 4
Re-Installing Your New SSD into your Surface Pro 8
Now that you have cloned your Surface Pro 8 SSD, you can remove them from their external USB enclosures.
To re-install the new SSD, it is just the OPPOSITE of removing it.
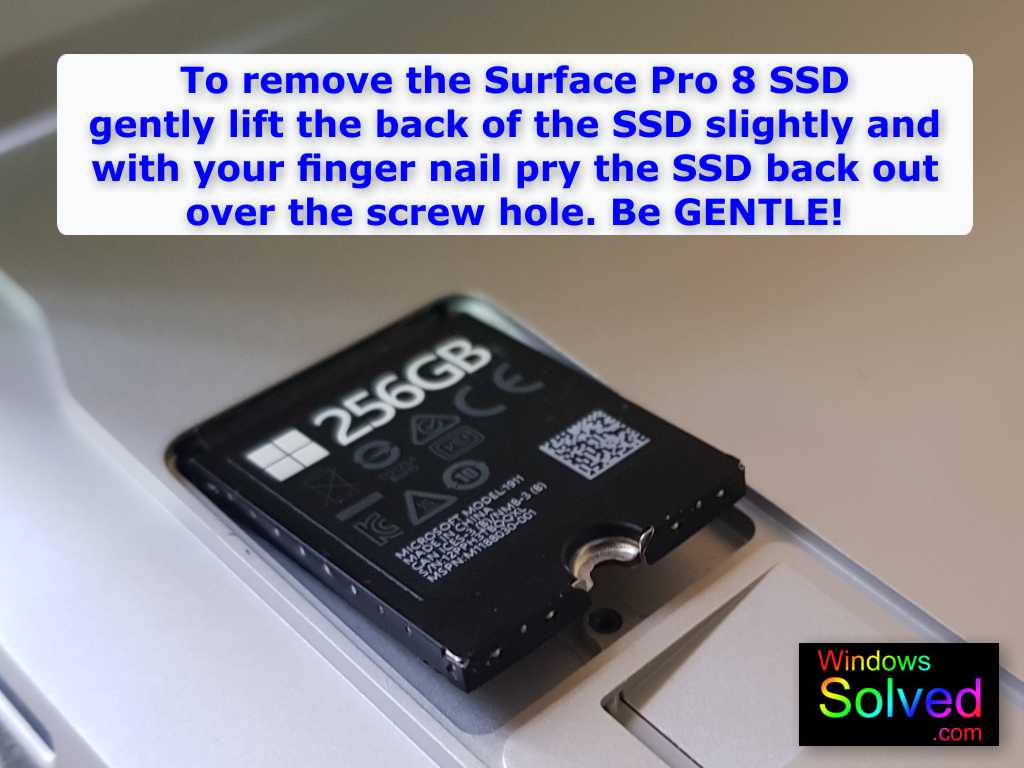
- As per the image below, gently insert the new SSD into the slot on the Surface Pro 8, keeping the back of the SSD slightly raised above the screw hole.
- Make sure the gap in the pins is aligned correctly. The small side with just 5 connections shown should be on the right (towards the center of the Surface Pro 8)
- Gently push the SSD into the slots and as it goes in, gently push the back of the SSD down so that the half-hole in the back of the SSD sits over the top of the screw hole.
- Do not force, bend or twist the SSD as it goes in and keep it as straight as possible.
Once your SSD is in the Surface Pro 8, it should look like the image below.
If it is sitting correctly in the slot, use your Torx (T4) precision screwdriver to secure the SSD inside your Surface Pro 8 with the same small screw you removed earlier.

Once the screw is in place, you can re-install the cover plate. It has a lip that will go under the Surface Pro 8 casing near where 256GB is printed in the image above. Once the lip is under the casing, just press the back of the cover down and it will lock into place.
Starting Your Surface Pro 8 for the First Time With Your New SSD
Important : Your Surface Pro 8 will not power on unless you have connected the Surface Pro 8 charger. Make sure you have plugged it in.
With the power cable connected, press the power button on the top right side of the Surface Pro 8. It should power up as per normal.
You should now log in, preferably under an Administrator account.
Give your newly upgraded Surface Pro 8 a workout. Specifically, make sure of the following :
- You can sign into your Microsoft Account
- Try signing into One Drive if you use it. As your SSD has changed, you may need to re-authenticate yourself within One Drive to get proper access to your files.
- Click Start and type System Information. Select Storage and then select Disks. Your new SSD should be showing with the full 1Tb or roughly 953GB of space showing – as per the image below.
- Optional – you can open Command Prompt (press start and type CMD) as an Administrator and check your disk using by typing chkdsk /f /r . It should tell you that the computer has to be restarted to run it. Being a new SSD, you should have no errors.
- Optional – if you want to check your Windows system files are all copied correctly, again open Command Prompt as an Administrator and type DISM /online /cleanup-image /restorehealth It should report that no system files were damaged or missing and no system repairs were required.

Check the Speed of Your New SSD
Open Command Prompt (press start and type CMD) as an Administrator
Type in winsat disk
It will give you your sequential read and write speeds.
You can run it a few times as each time you might get slightly different speeds.
If you used a Samsung PM991a 1TB SSD, you should get speeds similar to ours (as per the image below)

If your speeds are similar – congratulations but make sure you read the last step!
If your speeds are not similar and you are using a Samsung PM991a 1TB SSD, there could be something wrong with the SSD you received (faulty, non-genuine etc) and you may need to discuss it with the retailer you purchased it from.
Finally – make sure you re-enable BitLocker or Device Encryption!
As per Step 1 in this guide, go back into Windows Settings and turn on Bitlocker for Windows 11 Pro systems and Device Encryption for Windows 11 Home systems.
Important : This will generate NEW decryption keys, Make sure you print them and store them in your Microsoft Account!
We hope you enjoyed this article and found it a useful tool to upgrading your Surface Pro 8 to a much larger SSD at a fraction of the price compared to buying a 1TB model new.
If you liked our guide or would like to comment about it or suggest improvements, please leave us a comment below!
This solution was developed and confirmed on a Microsoft Surface Pro 8 Core i7 16GB RAM 256GB SSD LTE running Windows 11 Pro (version 22H2) by windowssolved.com | |
| This is an original article copyright to windowssolved.com This article may be shared via link to this page. You may not repost the content of this page, even with attribution without prior written permission. |


Loved the depth of information in this article—very helpful!