
How to Upgrade Microsoft Surface Pro 8 SSD – PART 3 of 4
This Guide has been broken up into 4 Parts
As this is a very detailed guide to enable you to safely and easily upgrade your Surface Pro 8 SSD, we have broken this article up into 3 Parts.
Part 2 – Which SSD to buy/use when upgrading the Surface Pro 8 SSD
Part 3 – (This Page) Cloning the Surface Pro 8 SSD
Part 4 – Reinstalling your NEW SSD into your Surface Pro 8
How to Upgrade Microsoft Surface Pro 8 SSD – PART 3 of 4
Please make sure you have completed Part 1 of our guide before proceeding
Cloning your Surface Pro 8 SSD to a new SSD
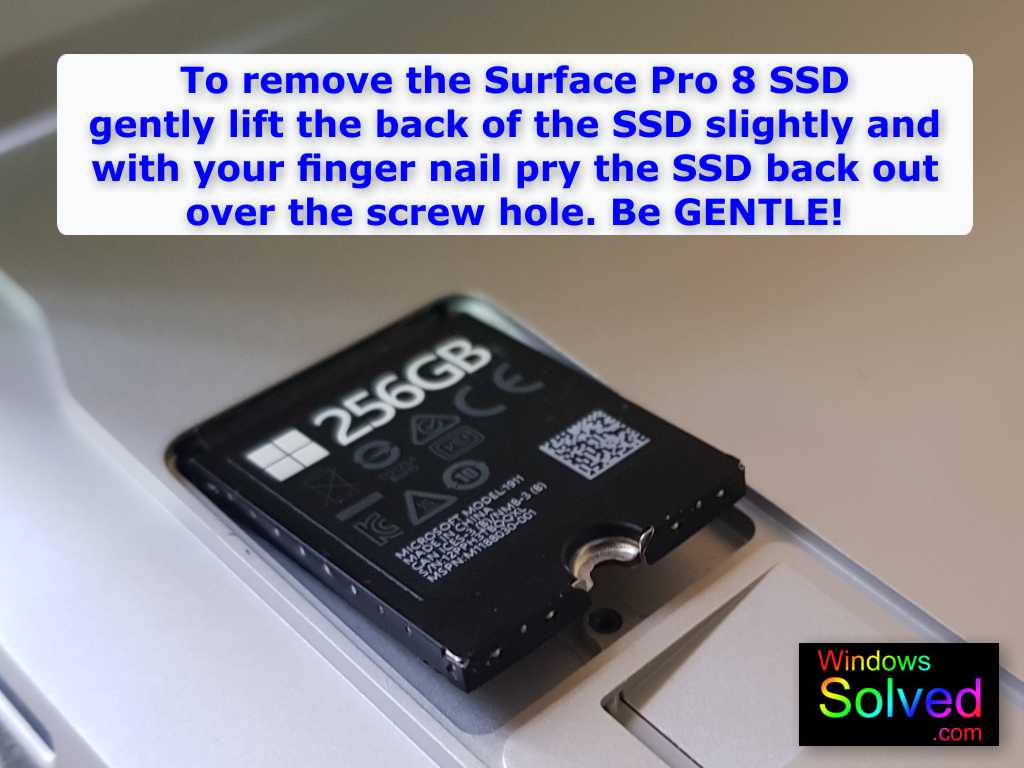
Part 1 of this guide shows how to remove the original Surface Pro 8 SSD.
Part 2 of this guide showed some options for you to buy a new larger SSD.
Once your original SSD has been removed and you have your new larger SSD, you are ready to commence the cloning process.
Removing Factory Heatsink from original SSD
As you can see in the image above, the SSD inside your Surface Pro 8 may look a little different to the one you just purchased. It appears thicker and there are some small black plastic tabs protruding from the casing around the pin connectors.
This is because the factory SSD is enclosed in a very thin aluminum casing that acts as a heatsink to help dissipate the heat generated by the SSD back into the Surface Pro 8 body. It helps keep the SSD cool.
This aluminum heatsink can be removed and re-used with your new larger SSD. This is reported by some as optional but we consider it essential to making sure your Surface Pro 8 operates normally and help prevent any possible warranty issues. So we recommend re-using it on your new SSD.
You can see in the image above, there are small silver dots around the outside of the SSD enclosure. These are tiny little pressure clips. If you look very carefully at your original SSD, you will notice just above those silver pressure clips and tiny gap. Working on a clean desk with clean paper on it, you can gently insert your fingernail into the little gaps and slowly pry the casing apart. You will need to release the clips on both sides of the SSD, as well as on both sides of the screw hole mount. Take care as the aluminum casing is extremely thin and you don’t want to bend it.
As the heatsink casing is removed from the SSD, you will notice some white paste inside it. This is thermal grease which helps transfer heat from the SSD to the heatsink. Pull it apart and place the SSD and the side of the heatsink with the paste down on your clean piece of paper.
Very gently use your Q-Tips or cotton swabs to clean the grease from the SSD and the heatsink. We recommend starting from the outside of the SSD and rolling it as you scrape the grease towards the center of the SSD. You need to go slowly and be sure to AVOID smearing the grease onto the rest of the SSD! Your will need several Q-Tips to do this. Once you have removed the majority of the grease, lightly moisten a new Q-Tip with your rubbing alcohol or isopropanol and clean the remaining residue off both the SSD and the heatsink. If you get any grease at all on the circuitry of the SSD, carefully remove it with a new Q-Tip slightly moistened with rubbing alcohol. Change Q-Tips frequently to avoid smearing it. Keep going until all grease is removed.
Applying New Thermal Paste to Your New SSD
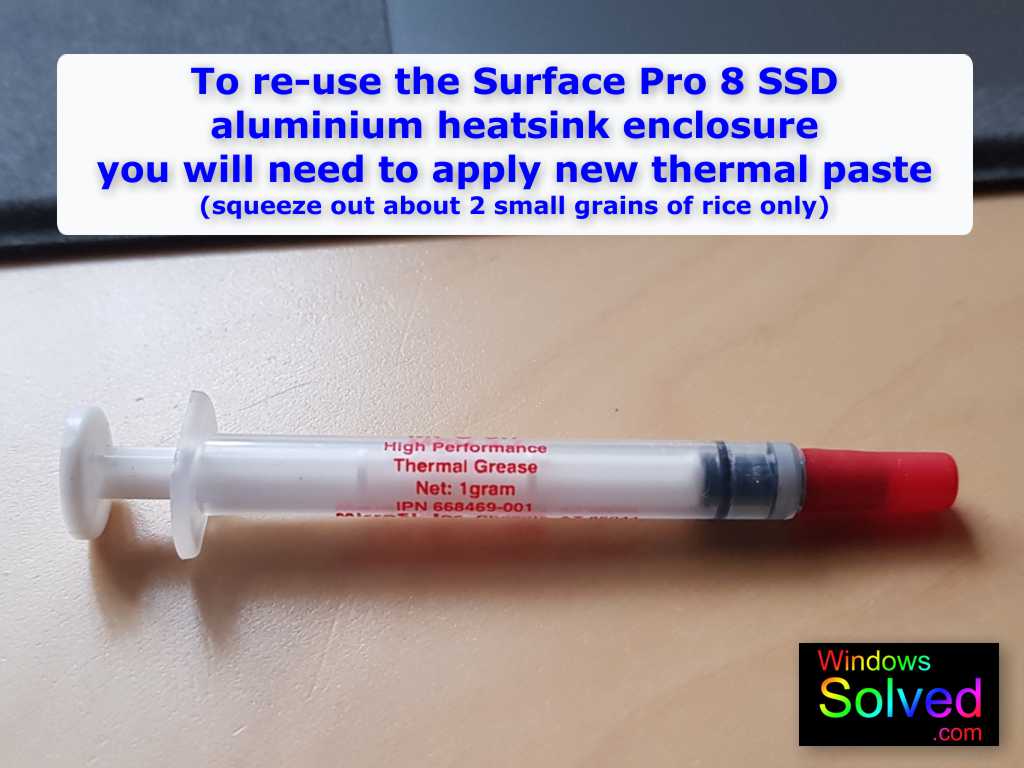
Don’t bother trying to re-use the white thermal paste you removed. Firstly you will just make a mess and secondly it will likely have small air gaps inside the re-used paste meaning it won’t work properly.
- Remove the sticker/label from your new SSD
- If any sticky residue remains from the sticker, gently clean it with a new Q-Tip and rubbing alcohol.
- Squeeze out about 2 small grains of rice of thermal paste into the very center of of the flat black part of the SSD that was under the sticker.
- Lay the SSD into the lower section of the re-used aluminum heatsink casing, so that the grease is facing up.
- Lay the top section of the heatsink over the SSD and position as close/straight as possible to the lower section.
- Gently squeeze the top and bottom of the heatsink casing together whilst at the same time making sure the casing is going back inside itself for the tiny silver pressure clips to lock again.
- As you squeeze the casing, the grease will be flattened and spread over the SSD.
- Do not try pulling the heatsink apart again as you will disturb the grease and likely put air into it – meaning you will have to clean it and start over again in order for it to work properly.
- Go slowly and inspect the casing and make sure it is locked in properly and looks nice and flat.
Mounting Your New & Old SSDs into External USB Enclosures?
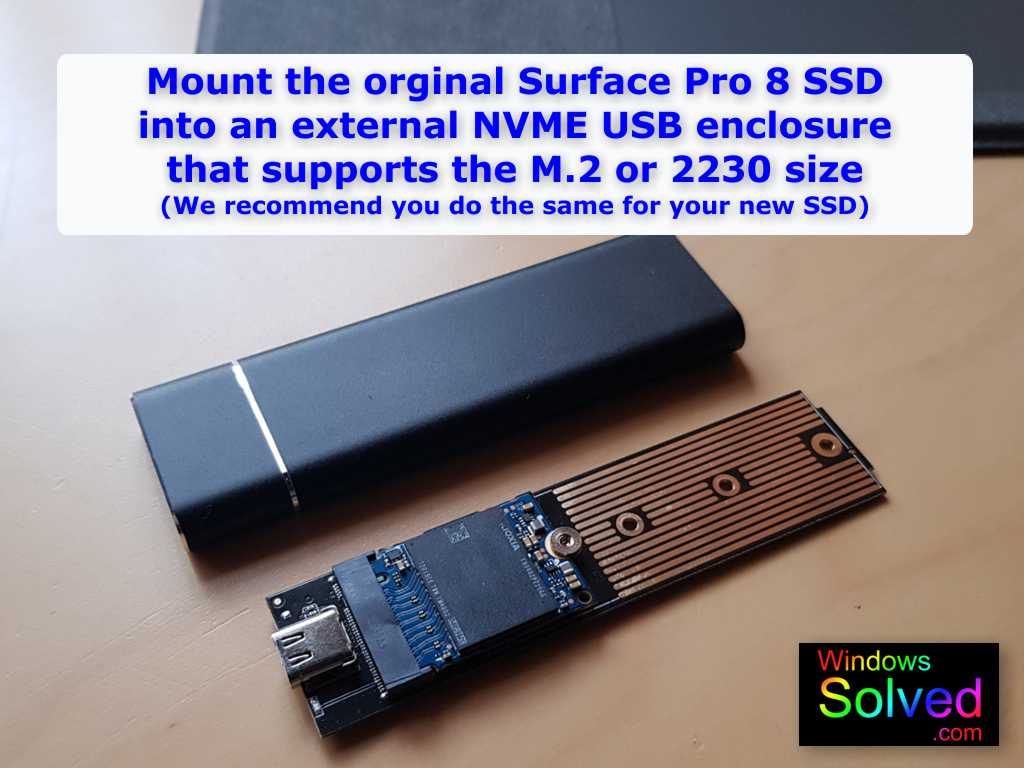
To clone your drives, it is easiest if you mount the original Surface Pro 8 SSD and your new replacement SSD into external USB enclosures. If you buy a standard NVME USB enclosure, just make sure it supports the 2230 size format as shown in the image above (our actual Surface Pro 8 SSD mounted in an enclosure, ready to be inserted into its casing).
Once both old and new SSDs are mounted into their external USB enclosures, you will be ready to connect them to another PC that already has the Hard Drive cloning software installed.
Cloning the Surface Pro 8 SSD
If you already have software for cloning hard drives, just make sure it is compatible with Windows 11.
If you don’t have software already, you can find lots of options. We used Macrium Reflect to clone our drives. Why? Because 1. It works and we had used it before when upgrading an LG Gram 16Z90Q SSD, 2. It easily resizes the partitions to fit your new larger drive & 3. You can use the Trial version for free for this task. They used to have a free version but apparently they no longer offer it. We downloaded a Trial Version and when the trial expires, it converts into a free limited commercial license.
We are NOT affiliated with Macrium Reflect in any way or form.
Our detailed cloning guide below is based upon Macrium Reflect.
You can download and install the 30 Day trial version directly from Macrium Software at https://www.macrium.com/products/home
Instructions for Cloning your SSD with Macrium Reflect
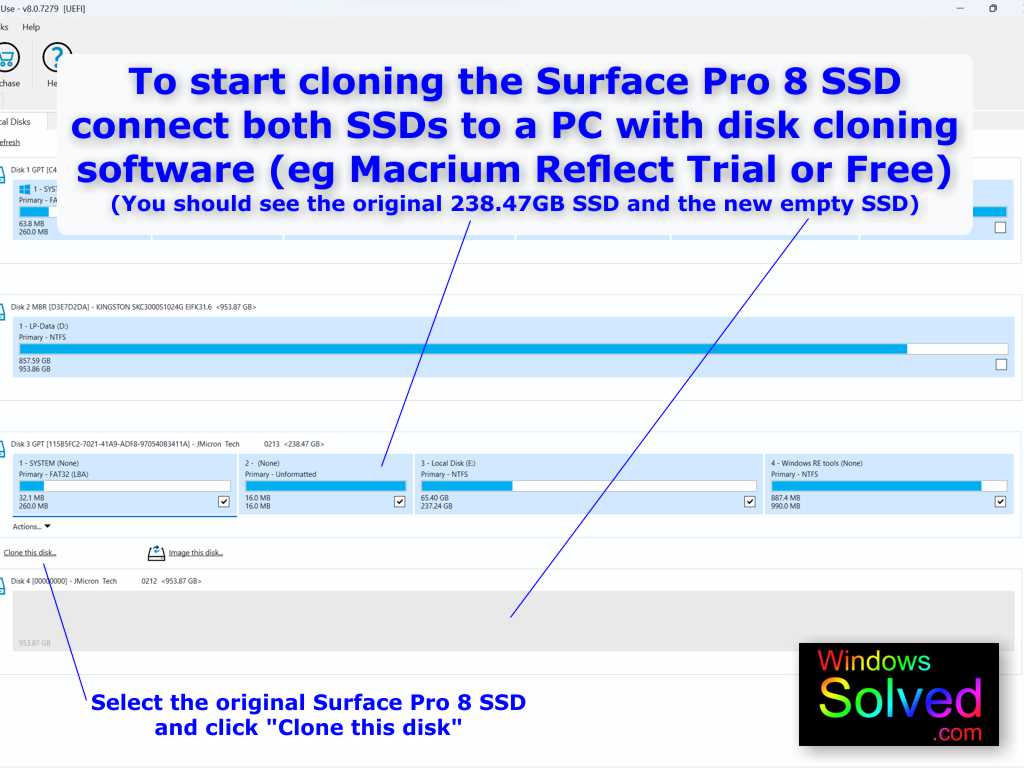
- Once Macrium Reflect is downloaded and installed on your other PC, connect both your original Surface Pro 8 SSD and new replacement SSD to that PC via their USB enclosures.
- Open Macrium Reflect and it should show you all of your disk drives on the PC. You will need Windows Administrator approval to open Macrium reflect.
- Identify the disk drives from the current PC – make sure you do NOT select these. It will show all drives connected to the PC.
- Identify the original Microsoft Surface Pro SSD. It will have 4 partitions. System (size 260MB), None (size 16.0MB), Local Disk (size will vary depending on your Surface Pro 8 being a 128, 256 or 512GB model. A 256GB model will show this partition as 237.24GB) and Windows Re tools (size 990.0MB).
- Identify your new SSD. If it is brand new, it will show up as grey as it has not been formatted and does not yet contain any partitions.
- Highlight you original Surface Pro 8 SSD (with the 4 partitions) and as per the image above, select “Clone this disk”
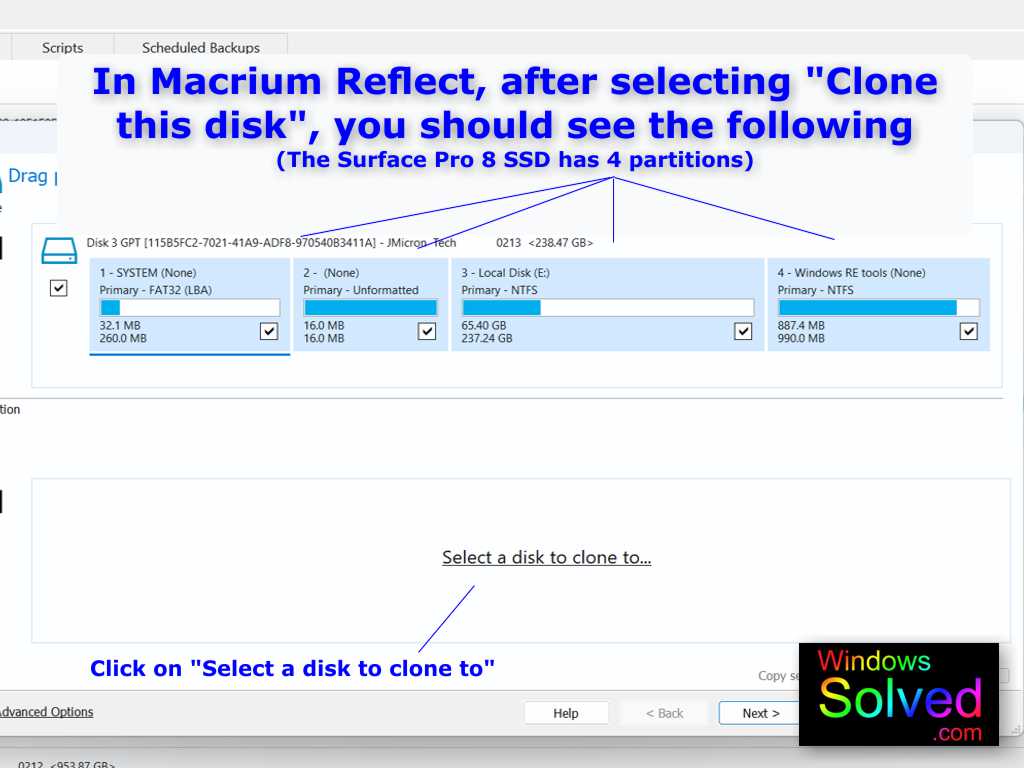
Next you will have to choose which disk to clone the Surface Pro 8 disk to. This will be your new SSD. Click on “Select a disk to clone to”
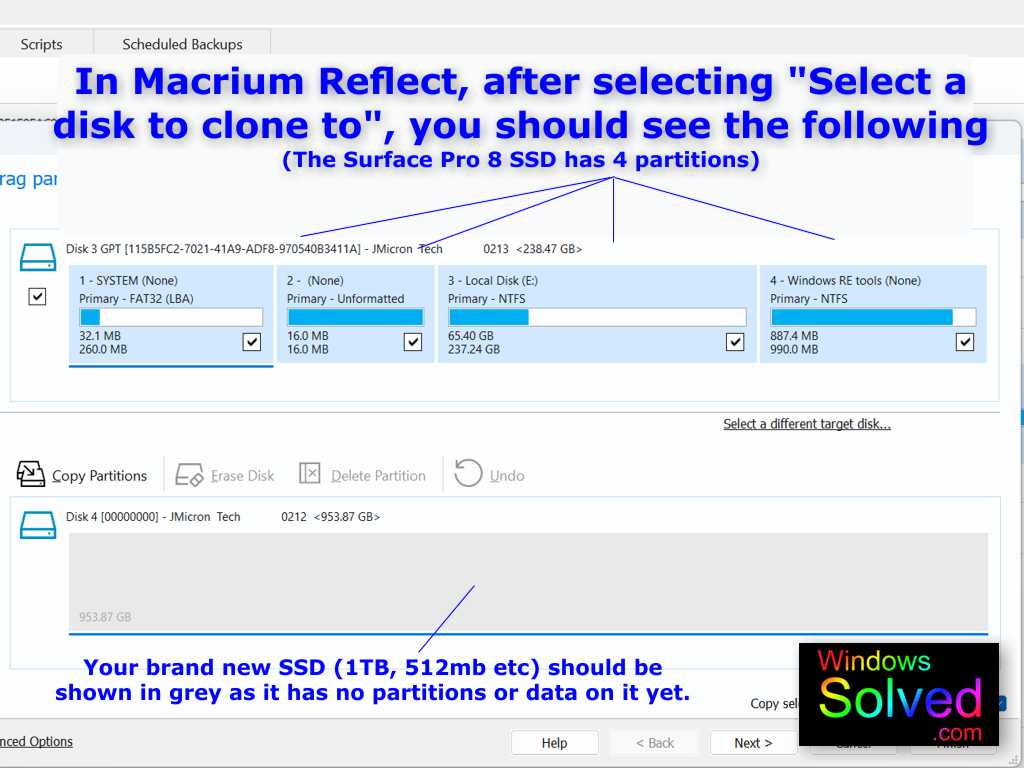
If your screen now looks the same as the image above, proceed to the next step.
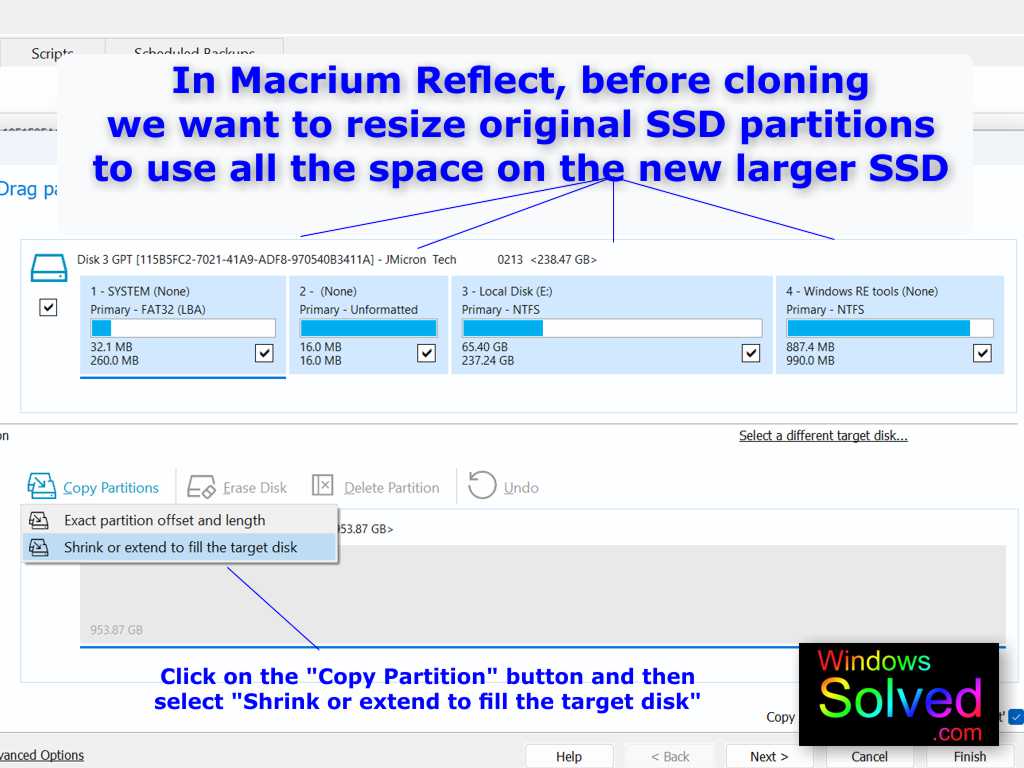
We now want to use Macrium Reflect to resize the partitions on the original Surface Pro 8 SSD to fit and fill your new larger SSD. If you don’t do this, you won’t get any extra space from your new SSD!
As per image above, Click on the “Copy Partitions” Icon. From the sub-menu that appears, click on “Shrink or extend to fill the target disk”
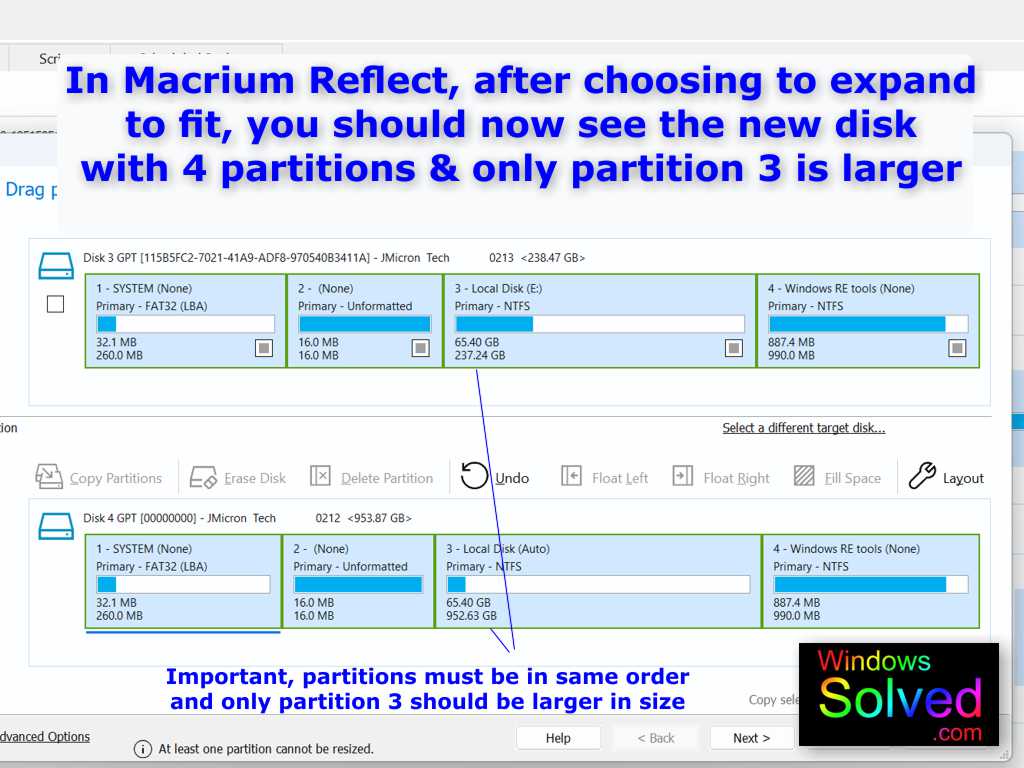
Your screen should now look the same as the image above should now see the the same 4 partitions on both disks.
Important – The only difference between the 2 disks should be the size of Partition 3 – Local Disk. It should me much larger (like 952GB for a 1TB SSD). All other partitions should be identical.
Also Important – The partitions need to be in the same sequential order! If the partitions are not in the same order, your windows recovery environment will not work properly. Make sure they are in the same order and the only difference is the sze of Partition 3 – Local Disk
If everything is in order, proceed to commence the cloning.
Click “Next”
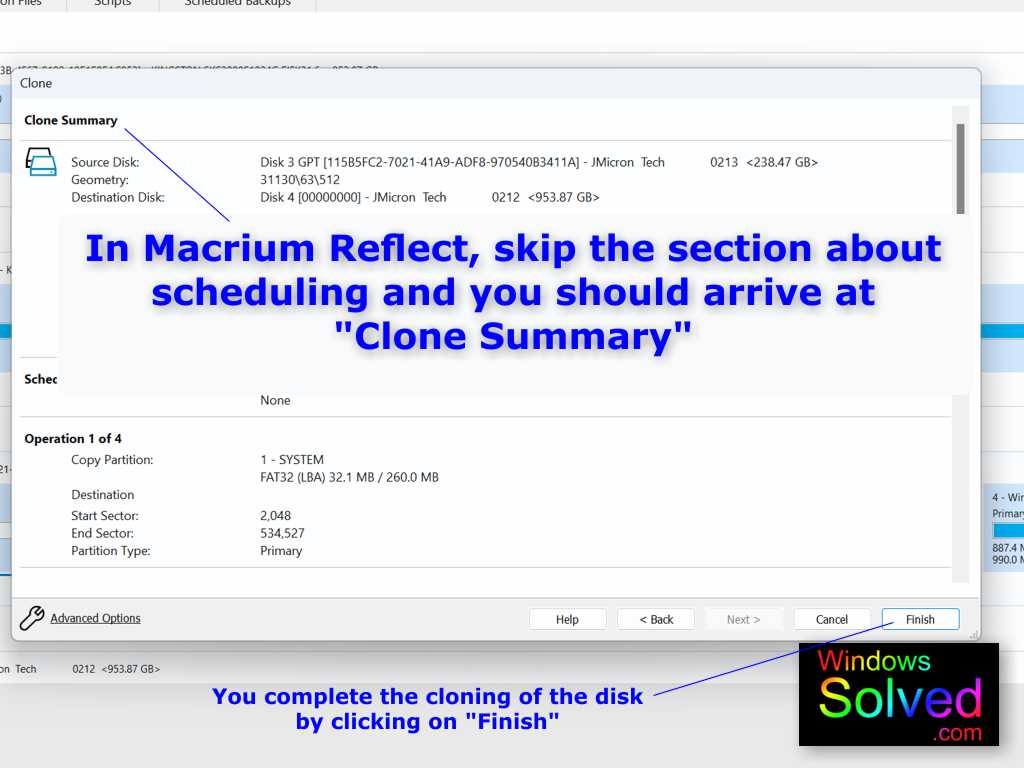
You may arrive at a screen that mentions scheduling. You can just ignore this and click next.
When you arrive at the summary screen as per the image above, the last step to commence cloning to to select “Finish”.
Once the cloning process has completed, you can close down Macrium Reflect.
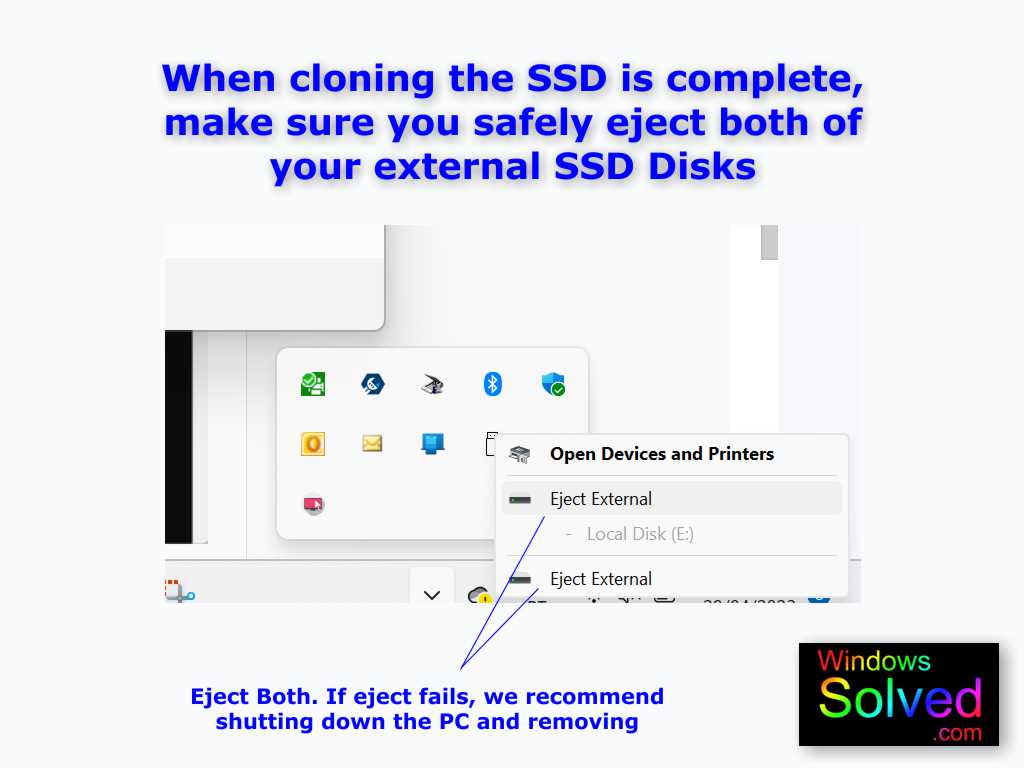
Make sure you safely eject both of your external USB SSD enclosures before you unplug or disconnect them. You may find that Windows reports that the disks are still in use and cannot be safely ejected. This is because Macrium Reflect may still have background tasks running. If you can’t safely eject, just shut down the PC and wait for the lights to go out on the external USB enclosures before unplugging them.
Once your have cloned your new SSD, you can proceed to step 4 of our guide – Re-Installing your NEW SSD into your Surface Pro 8.
This solution was developed and confirmed on a Microsoft Surface Pro 8 Core i7 16GB RAM 256GB SSD LTE running Windows 11 Pro (version 22H2) by windowssolved.com | |
| This is an original article copyright to windowssolved.com This article may be shared via link to this page. You may not repost the content of this page, even with attribution without prior written permission. |


My partner and I absolutely love your blog and
find many of your post’s to be exactly what I’m looking for.
Does one offer guest writers to write content for you personally?
I wouldn’t mind publishing a post or elaborating on some of the subjects you
write concerning here. Again, awesome site!